Paprika User Guide iPhone Edition
Welcome to Paprika Recipe Manager!
This guide will introduce you to all of the features available within Paprika. You will learn how to add recipes to Paprika, browse for recipes online, create grocery lists, make meal plans, and more.
If after reading this guide you have any questions that have not been addressed, please consult our knowledge base.
Table of Contents
Overview
Paprika is divided into four main sections, each of which is accessible by pressing the corresponding button in the side panel. Tap the menu button in the upper left corner of the toolbar to access this panel (or swipe on the left side of the screen.)
| Section | Description |
|---|---|
| Recipes | This is the main screen of the application, and contains your recipe collection. From here you can open individual recipes, search for recipes, and view recipes by category. |
| Browser | This built-in web browser allows you to browse for recipes online, and clip your favorite recipes into Paprika. |
| Groceries | This shows your current grocery list. From here you can check off grocery items as you shop, edit your grocery list, and add custom grocery list items. The pantry is accessible from this section. |
| Meals | This is Paprika's meal planner. You can use it to create weekly and month meal plans, and view your daily meal schedule. Menu planning is accessible from this section. |
Recipes
Browsing Recipes
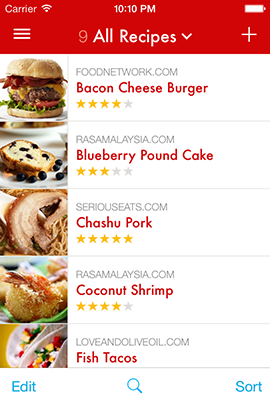
All of your recipes are displayed on the recipes screen.
Browsing by Category
All Recipes is the default selected category, which displays all of your recipes in alphabetical order.
If you would like to change the selected category, press the Categories button
in the toolbar and select a different category.
Note The name of the Categories button changes to reflect the currently selected category, and the recipe count in that category is displayed next to the name.
Browsing Subcategories

To select a subcategory, press the > button next to a category to navigate into its subcategories, and then tap on one of the subcategories.
Searching Recipes

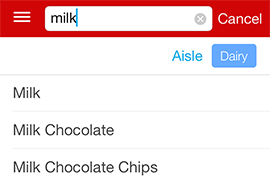
The recipes screen contains a search button that you can tap to search for specific recipes in your collection. Simply start typing and your recipes listing will be filtered by the search term.

By default, the search bar searches for your recipes based on the name of the recipe. You can use the filter
above the keyboard to change the search type between: name, source, and ingredients.
chicken, spinach.
Sorting Recipes

You can sort recipes by tapping the Sort button in the lower right toolbar.
Currently you can sort recipes by: Name, Rating, or Most Recent.
Adding & Editing Recipes
Adding a Recipe

To add a new recipe, press the + button in the upper right hand corner of the recipes screen.
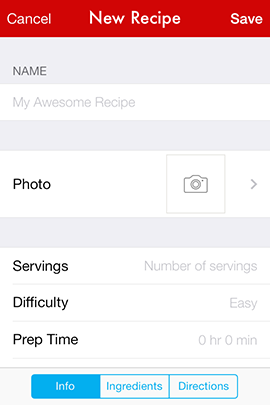
An empty recipe screen will appear, allowing you to enter in the recipe information you would like to save,
such as: name, difficulty, servings, prep time,
cook time, categories, rating, notes, and nutrition.
You can switch between the recipe info, ingredients, and directions using the
segmented control in the lower toolbar.
Optionally, add a photo from your photo library or camera by tapping the Photo button.
When you're finished entering in your recipe, press the Save button to save your changes.
Editing a Recipe

You can edit a recipe by pressing the Edit button in the upper right corner of the recipe screen.
Note To delete an existing recipe: press Edit, scroll to the bottom of the info section, and press Delete Recipe.
Deleting Recipes
There are several ways to delete a recipe:
From the recipes list:
- Swipe left across the recipe to reveal the Delete button, and then press Delete.
- Press Edit to put the recipes list into edit mode. Select one or more recipes, and then press the Delete button in the toolbar.
From the recipe screen:
- Press Edit to edit the recipe, scroll to the bottom of the info section, and press Delete Recipe.
Recipe Fields
These the fields that you can enter when you create or edit a recipe:
| Field | Description |
|---|---|
| Name | The name of the recipe. |
| Difficulty | The difficulty of the recipe. |
| Servings | The number of servings this recipe makes. |
| Prep Time | The amount of preparation time this recipe requires. |
| Cook Time | The amount of cooking time this recipe requires. |
| Rating | A star rating from 0 to 5 for this recipe. |
| Categories | The categories this recipe belongs to. |
| Source | Where this recipe came from. |
| Source URL | This is an optional field that records the original URL of the recipe if it came from a website. |
| Notes | Any cooking notes you would like to include with the recipe. |
| Nutritional Info | Any nutritional information you would like to record for this recipe. |
| Ingredients | The ingredients required for this recipe. Note Create ingredient headings by ending them with a colon (e.g. Sauce:). |
| Directions | The directions for this recipe. |
| Photo | A photo you would like to associate with this recipe. You can select a photo from your photo library, or take a new photo from the camera. |
Viewing a Recipe
From the recipes screen, tap on a single recipe in the listing in order to open the recipe.
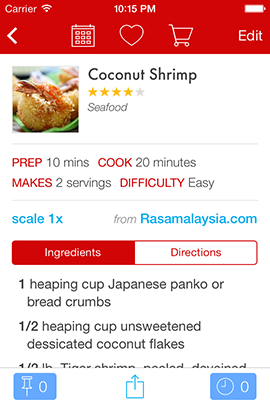
This is the main recipe view. The recipe info is displayed on top, and ingredients are displayed below. You can use the segmented control to switch between viewing ingredients and directions.
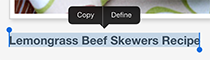
Note If the recipe has a source URL, the source will be highlighted
blue. You can tap on the source to load the original source URL in the browser.
Recipe Actions
The toolbar contains several actions you can perform with the recipe:

| Action | Description |
|---|---|
| Add to Meal Planner | You can add a recipe to the meal planner using this button. Select the date and meal you would like to add this recipe to, and then press Save. |
| Add to Favorites | Add this recipe to your favorites. |
| Add to Grocery List | Add this recipe to the grocery list. You'll be asked to choose ingredients first. |
Less common actions are placed under the Actions button in the lower toolbar.

| Action | Description |
|---|---|
| AirDrop | Allows you to AirDrop the recipe to someone nearby. (Only enabled if your device supports AirDrop.) |
| Shares the recipe name and photo on Twitter. (Only enabled if you have Twitter enabled in your device Settings.) | |
| Shares the recipe name and photo on Facebook. (Only enabled if you have Facebook enabled in your device Settings.) | |
Email recipients can import the recipe into their copy of Paprika by tapping the .paprikarecipe attachment. |
|
| Printing recipes requires an AirPrint-enabled printer. | |
| Duplicate | Allows you to save a new copy of the recipe. |
| Converter | Displays a unit converter. |
Printing Recipes
As described above, printing is accessed via the Actions button in the recipe toolbar. There are several options you can configure for printing:
| Option | Description |
|---|---|
| Show Photo | Allows you to disable printing of the photo. Useful if you want to save ink. |
| Font Size | Allows you to change the font size of the printed recipe. |
| Page Size | Allows you to change the page size of the printed recipe. Options available are: Full Page,
4 x 6 Index Cards, and 3 x 5 Index Cards. |
| Margins | Allows you to adjust the printer margins. |
| Save as Defaults | Saves the current print options for next time. |
Timers
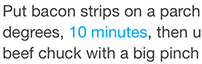
Timers are automatically detected in your recipe's directions and highlighted in blue. In order to start a timer, simply tap on the highlighted time and press Start. The timer countdown will appear in the lower toolbar.
Note One active timer will be displayed in the lower toolbar.
Viewing timers - To view all of your active timers, tap the Timers button in the lower toolbar. This brings up the timers list.

Adding a timer manually - From the timers list, tap the Add Timer button. You can choose a name for the timer (the recipe name is the default). Once you have selected a time, press Start to begin the timer.

Removing timers - Timers are automatically removed once they have elapsed. If you would like to manually remove a timer: you can either swipe to delete it from the list, or tap the Edit button in the upper left toolbar and choose the timers you want to delete.
Editing timers - To change the name or time of a timer, select the timer from the timers list. You can also pause, resume and cancel the timer from this screen, and see the remaining duration of the timer.
Note Timers will fire and play a sound even if the app is not open. If you run into issues, ensure that your device is not muted, and that your volume is turned up.
Scaling Ingredients
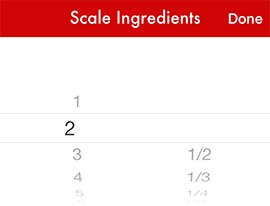
You can scale the ingredients of a recipe by tapping the scale 1x button next to the Ingredients heading.
When the ingredients scaling popover appears, select the amount you'd like to scale the ingredients by and they will change automatically. The
scale button will update to display the current recipe scale.

If you add a scaled recipe to the grocery list, the grocery list items will preserve the ingredients scaling.
Note Paprika anticipates this ingredient format: quantity unit ingredient, i.e. 1 cup milk.
For best results, ensure your ingredients are entered in this format.
Crossing off Ingredients
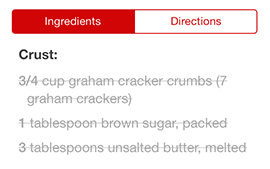
When you are cooking, you may find it useful to cross off ingredients once you have used them. Simply tap the desired ingredient in order to cross it off. (Tap again to un-cross it.)
Marking Directions
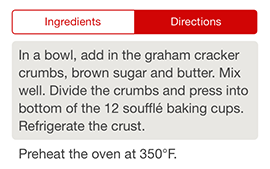
You can also highlight the current step of your directions by tapping on it to help keep your place.
Pinning Recipes
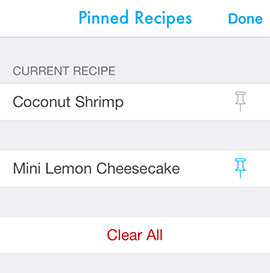
You can pin active recipes to easily switch between them while you are cooking. To pin a recipe, tap the Pins button in the lower toolbar, and then tap on the Pin icon next to the current recipe. (Tap again to un-pin.)

Your pinned recipes will be displayed in the pins list. Tap on any of these recipes to switch to them. When a recipe is pinned, Paprika will keep track of the ingredients you have crossed off and the current directions you have highlighted, so you don't lose your place.
When you're done cooking, simply tap on Clear All to un-pin all of your recipes.
Categorizing Recipes
Paprika allows you to organize recipes into categories to make them easier to manage.
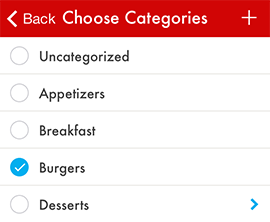
Assign a Recipe to a Category
To edit a recipe's categories, navigate into the recipe and tap the Edit button in order to edit the recipe. From here, scroll down and press the Categories button to access the recipe's categories. You can check one (or more) categories to associate with the recipe. Press the Save button when you are done.
Shortcut From the main recipes listing, tap and hold on a recipe in order to access the actions menu for a recipe, and then select Categorize. This allows you to quickly assign categories to a recipe without having to open up the recipe itself.
Adding a Category
You can add a category by pressing the + button in the categories toolbar.
Optional To create a subcategory, press Parent and choose the parent category of the subcategory you would like to create.
Editing Categories
Press the Edit button in the categories toolbar in order to rename, sort, and delete categories.
Built-in Categories
There are 5 built-in categories. These categories cannot be removed and provide special ways to view your recipes:
| Category | Description |
|---|---|
| All Recipes | Lists all of the recipes in your collection in alphabetical order. |
| Most Recent | Sorts your recipes by the date they were added, with the most recent recipes near the top. |
| Top Rated | Lists all of the recipes in order from highest star rating to lowest. |
| Favorites | List all recipes that you have added to your favorites. |
| Uncategorized | Lists all of the recipes that have not been assigned to a category. |
Browser
Paprika's built in web browser lets you easily search the internet for your favorite recipes and save recipes from many different websites.
Using the Browser
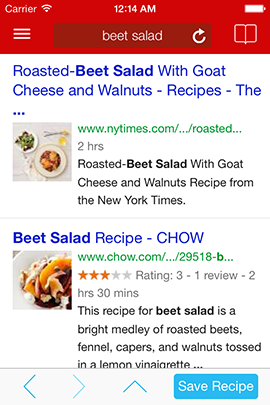
The upper browser toolbar contains a combined address and search bar, and a Bookmarks button.
Type a URL into the address bar to navigate to that page (ex: 101cookbooks.com) or type in a search term to perform a
Google Recipe Search. (ex: beet salad). Your last 5 searches are saved in a recents history and will be displayed when you tap the address bar.
The Bookmarks button displays your current bookmarks. From there you can load a bookmark into the browser, edit a bookmark, and add new bookmarks to the list. Bookmarks sync with other cloud data.
The lower toolbar displays buttons for standard browser actions and tools for saving recipes. In order from left to right, the buttons are: navigate back, navigate forward, expand/contract clipboard tools, and save recipe.
Clipping Recipes Online
Paprika supports clipping recipes from hundreds of different recipe sites. In order to clip a recipe:
- Use the web browser to browse to a recipe you would like to save.
- Press the Save Recipe button in the lower right corner of the toolbar.
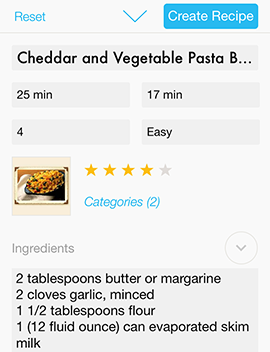
- Paprika will attempt to clip the recipe from the page. Press the Create Recipe button to save it.
- If Paprika cannot figure out how to clip the recipe, it will display an error message. You can then use the manual clipboard tools (described next) to clip the recipe manually.

Manually Saving Recipes Using the Clipboard Tools
To use the clipboard tools:
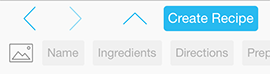
- First, tap on the Up button to reveal the clipboard tools.
- First, find the name of the recipe on the website. Then tap and hold your finger over the name until the blue selection handles appear.
- Drag the selection handles until the name is fully selected.
- Tap the Name button in the clipboard toolbar. The selected text will be copied into the
Namefield. - Repeat the same process with the
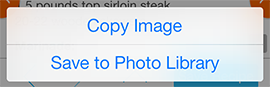
Ingredients,Directions, and any other fields you would like to capture. You can scroll the toolbar horizontally to reveal the extra fields. - To save an image, tap and hold your finger over the image. Then select Copy Image from the popup that appears.
- When you've copied all the fields you would like to save, press Create Recipe to transfer all of your copied information into a new recipe.


Tips
- Press the Up button to expand the clipboard tools fully. Press again to collapse.
- You can press the Reset button in order to clear your copied selections and try again.
- You can press any of the Name, Ingredients, Directions, etc buttons at the bottom to reveal the existing text that you have copied into them. From there you can also freely make changes to the text.
- If text already exists in a field when you tap the button, the current selection will be appended to the existing text.
Groceries
Paprika's grocery list makes it easy to shop for your recipes. You can add entire recipes to the grocery list, as well as your own custom items.
By default, your grocery list will be sorted into aisles based on the type of ingredient. For example, milk
will be placed into the Dairy aisle, and spinach will be placed under Produce.
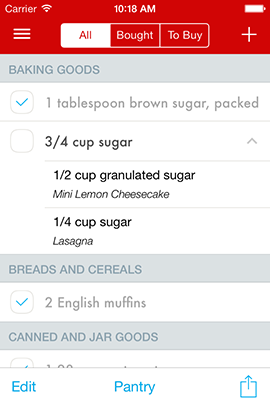
The grocery list will attempt to consolidate similar items with one another. For example, if one recipe calls
for 2 eggs, and another recipe calls for 3 eggs, the consolidated listing will
display 5 eggs total.
Consolidated items will be displayed with an arrow next to them. Tap on the row in order to expand the listing and reveal the original items.
Note You can turn off both the the grocery list aisle sorting and consolidation features in the Settings panel if you do not find them useful. If you turn off sorting by aisle, your grocery list will be sorted by recipe instead.
Adding a Recipe to the Grocery List

To add an entire recipe to the grocery list, open the recipe and press the Shopping Cart button in the toolbar.
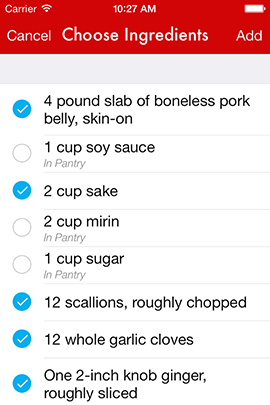
An ingredients pane will pop up displaying that recipe's ingredient list. Here you can check/uncheck ingredients before they are added to the grocery list.
(For example, if you already have salt at home, you can uncheck it before adding the recipe to the grocery list.)
Note Ingredients you have added to your Pantry will be automatically unchecked for you.
Once you have the correct ingredients selected, press the Add button to add those ingredients to the grocery list.
Shortcut You can also add recipes to the grocery list from the main recipes listing, by tapping and holding on the recipe and then selecting Add to Grocery List.
Adding a Custom Item to the Grocery List
Custom items can be added to the grocery list by pressing the + button in the upper right corner of the screen.
If you are adding a common grocery item, the aisle will be automatically selected for you as you type. You can also tap on the Aisle button to set a specific aisle.
Your current entry will also be autocompleted as you type. You can tap on an entry to select it.
Editing Grocery List Items
To edit a grocery list item, press Edit in the toolbar, and then tap the blue info button next to the item you want to edit.

From here you can edit the grocery list item and change its aisle.
Marking Items as Purchased

Mark an item as purchased simply by tapping on its checkbox. A checkmark will appear to indicate that the item has been purchased. You can mark the item as unpurchased by tapping it once more.
Filtering Grocery List Items

You can filter grocery list items according to whether they are purchased or unpurchased using segmented control
in the toolbar. (When you are shopping you may find it easiest to select: To Buy, to only show the unpurchased
items left on your grocery list.)
Removing Items from the Grocery List
You can remove individual items from the grocery list by pressing the Edit button in the toolbar, selecting the items to remove, and then pressing Delete.
Shortcut You can also swipe across an item and then tap the Delete button.
Finally, you can clear the entire list using the Clear Grocery List button described next.
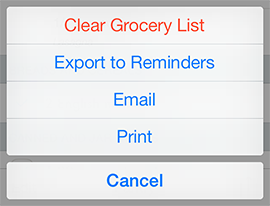
Grocery List Actions
You can access these actions by pressing the Actions button in the lower right corner of the toolbar.
| Action | Description |
|---|---|
| Clear Grocery List | Removes all items from your grocery list. You can choose between clearing all items, or only clearing purchased items. |
| Export to Reminders | Exports your grocery list to Reminders. By default the Reminders list will be named Paprika, but this can be
changed under Settings. |
| Send an email containing the contents of the grocery list. | Print out the grocery list. |
Using the Pantry
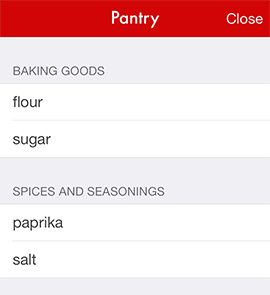
The pantry can be accessed by pressing the Pantry button in the lower toolbar.
Use the pantry to keep track of common ingredients you already have at home, such as: salt, pepper,
flour, sugar, etc.
To add an item to the pantry, press the + button and begin typing an ingredient name. A list of autocompleted ingredients will be displayed below. Tap on one of the ingredients to add it to your pantry.
Ingredients placed in your pantry will automatically be unchecked when you add recipes or meal plans to your grocery list.
Note The pantry is currently limited to pre-defined ingredients, however we are planning to make it more customizable in the future.
Meals
Paprika comes with a built-in meal planner that can be used to create monthly or weekly meal plans.
Switching Views
Use the segmented control at the top to switch between the monthly view and the weekly view. Use whichever view you prefer most.

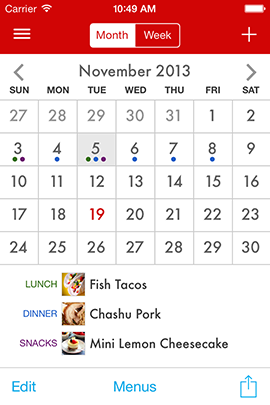
Monthly View
The monthly view shows an entire month's worth of meals at once. Select a day to see all of the meals you have scheduled for that day.
Use the < and > buttons to switch between months.
Shortcut Alternatively, you can swipe left and right between months to navigate to the previous or next month.
Weekly View
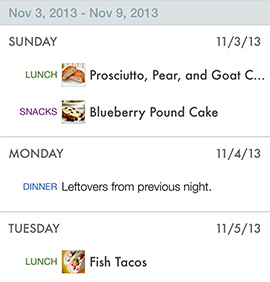
The weekly view displays a week's worth of meals at a time. To change the displayed week, simply scroll up or down.
Adding a Meal
Adding meals can be done from meal planner, or directly from the recipe screen.
From the Meal Planner
To add a meal from the planner, press the + button. Follow the wizard which will walk you through the steps of adding a meal:
- Choose between adding a
Recipe, aNote, or an entireMenu. - Depending on your selection:
- Recipe - Choose a recipe.
- Note - Type in a note.
- Menu - Select a menu.
- Choose a date for your meal, and then press Next. Note The calendar will show your currently planned meals.
- Choose the meal type (
Breakfast,Lunch,Dinner,Snack), and then press Save.
From the Recipe Screen

Open a recipe, and then press the Calendar button in the toolbar to add that recipe as a new meal.
Choose a date for this meal, and then press Next. Choose a meal type
(Breakfast, Lunch, Dinner, Snack), and then press Save.
Editing Meals
Press the Edit button in the lower left toolbar to edit, delete, copy, or move meals.
Changing a Meal's Date or Type
In edit mode, tap the blue Info button next to the meal you would like to edit, and use the popup which appears to make changes. Press Save when you are done.
Deleting Meals
In edit mode, select the meals you would like to delete. Press the Delete button to delete those meals.
Moving or Copying Meals
In edit mode, select the meals you would like to move/copy. Press the Move or Press the Copy button, and then select the date to move/copy those meals to.
Meal Planner Actions
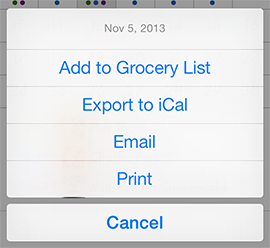
Meal actions are accessed two different ways, depending on whether you are in the monthly view or the weekly view:
Monthly View - Tap on a day to select it. The Actions button is displayed in the bottom right toolbar. The actions will apply to all of the meals for that day.
Weekly View - Tap the Select button and select one or more meals. The Actions button is displayed in the middle of the toolbar.
Note Use the checkbox in the weekly header to select all meals for that week at once.| Action | Description |
|---|---|
| Add to Grocery List | Add the ingredients for the currently selected meals to the grocery list. |
| Export to iCal | Exports the currently selected meals to iCal. By default the exported calendar will be named Paprika, but this can be
changed under Settings. |
| Email a meal plan for the currently selected meals. | Print a meal plan from the currently selected meals. |
Using Menus
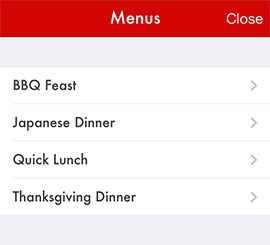
You can create reusable menus from your favorite meals.
Menus can be accessed by pressing the Menu button in the lower toolbar.
To add a new menu, + button and enter in a name (and an optional note).
Select the new menu item to open it, and then tap on the + button to add items to it. Like the meal planner, you can choose between adding recipes, or adding notes.
Once a menu is created, it can be added to the meal planner. When you add a menu to the meal planner, all of the recipes and notes in the menu are added to the day you select.
Settings
The settings panel allows you to configure Paprika's default behavior.
It also provides access to Papika's syncing, backup, import, and export features.
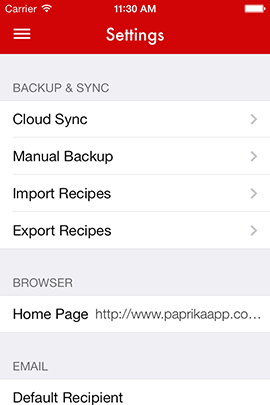
Accessing the Settings Panel

Paprika's settings panel can be accessed by pressing the Gear button in the side panel.
List of Settings
| Browser | |
| Home Page | Can be used to set the default home page on the browser screen. |
| Default Recipient | Sets a default recipient in the To: field for any email messages. Note You can enter multiple recipients by separating them with commas. |
| Appearance | |
| Recipe Font Size | Adjusts the font size of the ingredients and directions on the recipe screen. |
| Alphabetize Categories | If turned on, categories will be automatically sorted alphabetically. Otherwise, you will be able to arrange them manually. |
| Show Recipe Index | Shows an alphabetical indexed list to the right side of the recipes which lets you navigate to a specific
section containing recipes which begin with that letter. Note this is
only displayed if your Sort option is set to Name. |
| Auto-Lock Screen | If turned on, the screen sleep timer will be automatically disabled when you are viewing a recipe, and re-enabled when you close the recipe. This prevents the screen from turning off while you are cooking. |
| Keyboard Shortcuts | Lets you configure the keyboard shortcuts that are displayed when you edit the ingredients and direction. |
| Show Image Placeholder | Shows a placeholder for recipes that do not have a photo. |
| Grocery List | |
| Sort By Aisle | If turned on, the grocery list will be sorted into aisles based on the type of ingredient. For example,
milk will be placed into the Dairy aisle, and spinach will be placed
under Produce. If turned off, the grocery list will be sorted by recipe instead. |
| Consolidate Ingredients | If turned on, the grocery list will attempt to consolidate similar items with one another. For example,
if one recipe calls for 2 eggs, and another recipe calls for 3 eggs, the consolidated
listing will display 5 eggs total. If turned off, the grocery list will display each item
individually. |
| Reminders Export Options | Allows you to configure the name of the Reminders list created when you export your grocery list. Also allows you to delete the exported list. |
| Meal Planner | |
| Week Starts On | First day of the week. Used when displaying a week of meals or selecting a date for a meal. |
| iCal Export Options | Allows you to configure the name of the Calendar when you export to iCal. Also lets you configure what time each meal type is exported to. Finally, it also lets you delete the exported Calendar. |
Paprika Cloud Sync
What is Paprika Cloud Sync?
Paprika Cloud Sync is a free online backup and syncing service for your recipe collection. With the exception of the available space on your device, there is no limit to how many recipes you can store, or to how many devices can use the same account.
Note Paprika Cloud Sync is different than Apple's iCloud, although if you'd like you can use the same credentials for both, but you will need to create a separate Paprika Cloud Sync account through the Settings panel of Paprika.
What does it do?
Paprika Cloud Sync will automatically back up your recipes, categories, bookmarks, groceries, and meals to our cloud servers, ensuring that your recipe collection is always safely backed up.
You can also use it to keep Paprika's data synced with other devices.
How much does it cost?
Paprika Cloud Sync is free.
Accessing Paprika Cloud Sync

Paprika Cloud Sync can be accessed by pressing the Sync button
in the side panel. It can also be accessed via the Cloud Sync option in the
Settings panel.
Creating an Account
You'll create one Paprika Cloud Sync account for all devices sharing the same recipe collection. You can do this through the settings pane of any version of Paprika that you have purchased, and then log in to that same account on all other versions of Paprika.
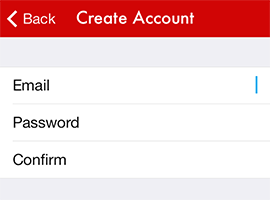
To create an account, open the Settings panel, and then select Cloud Sync from the list of options. Then select Create Account.
Enter in the email address and password you would like to use for this account.
Logging In
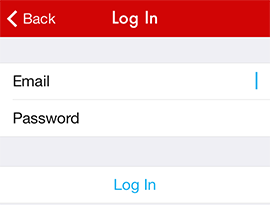
If you already have an account, you can log back into it using the Log In button on the sync screen.
Managing your Account
After logging in, you can manage your account and sync status from the Cloud Sync settings pane.
| Account Status | |
| The email address associated with the account. | |
| Logout | Pressing this lets you log out of your account and cancels the sync, if running. |
| Sync Status | |
| Last Synced | The date of the last successful sync attempt. |
| Status | The result of the last sync attempt. This will say Success if you were able to successfully sync. If your
device was not able to connect to the sync server, the associated message will be displayed here. |
| Sync Now | Pressing this will initiate a new sync immediately. |
| Sync Settings | |
| Update |
You can choose how often you would like to sync using the Update settings screen.
|
Quick Sync
If you are logged in, the sync button on the recipes screen acts as a shortcut button that will initiate a new sync.
Manual Backup
It is possible to import and export manual backup files via iTunes file sharing.
Warning These backups are not meant to be shared between cloud sync
accounts; they are meant to manually backup a single account's collection. Use the .paprikarecipes export
to share your collection with others.
To create a new backup
- Press the Create New Backup button.
- A new backup file will be created that is accessible via iTunes file sharing.
- Use iTunes file sharing to retrieve the backup file and store it someplace safe.
To restore a backup
- Press the Restore Previous Backup button.
- You will be prompted to select a backup to restore from.
- Paprika will need to be restarted in order to perform the restore.
- Confirm that you would like to quit and restart Paprika.
- Re-launch Paprika to complete the restore process.
Note We highly recommend using Paprika Cloud Sync as your primary backup mechanism, instead of relying on manual backups. It's a lot easier to use. Once you set up your sync account, your recipes will be backed up automatically, and you don't have to worry about managing your backups manually.
Import Recipes
Paprika can import recipe databases from several other applications. To perform an import:
- Add the file to Paprika via iTunes file sharing.
- Navigate to the
Import Recipesscreen in the settings panel. - Select the file to be imported.
The currently supported file types are:
| Supported File Types | |
| .paprikarecipe & .paprikarecipes | Paprika's emailed recipe format and its export format. |
| .ysr | YummySoup! export format. |
| .mgourmet, .mgourmet3, & .mgourmet4 | MacGourmet export format. |
| .mx2, .mxp & .mz2 | MasterCook export formats. |
| .mmf | MealMaster export format. |
| .fdx & .fdxz | Living Cookbook export formats. |
| Yum! .xml files | Yum! XML export format. Note Not all versions of Yum! will export to this format. |
| .vrc | SousChef export format. |
| .yml | A plain YAML file. See below for more details on this format. |
YAML Format
YAML is a simple, plain text file with sections delimited by key-value pairs. To indicate a block of text, use an initial pipe character, as shown in directions and ingredients. Consistent indenting should be used, but the order of the fields does not matter, and most are optional with the exception of the name, ingredients and directions. It is recommended that you use an online YAML validator such as this one to validate your file if you're experiencing difficulties importing.
Note We've added several new fields: on_favorites takes a yes value and indicates that the recipe should be added to your favorites.
categories is a YAML list; the category will be created if it does not exist. photo is a base-64 encoded image. All these new fields are
optional.
YAML recipe example:
name: My Tasty Recipe
servings: 4-6 servings
source: Food Network
source_url: http://www.google.com
prep_time: 10 min
cook_time: 30 min
on_favorites: yes
categories: [Dinner, Holiday]
nutritional_info: 500 calories
difficulty: Easy
rating: 5
notes: |
  This is delicious!!!
photo: (base-64 encoded image)
ingredients: |
  1/2 lb meat
  1/2 lb vegetables
  salt
  pepper
  2 tbsp olive oil
  4 cups flour
directions: |
  Mix things together.
  Eat.
  Tasty.
  Yum yum yum.
YAML multiple recipes example:
- name: My Tasty Recipe
  servings: 4-6 servings
  source: Food Network
  source_url: http://www.google.com
  prep_time: 10 min
  cook_time: 30 min
  nutritional_info: 500 calories
  on_favorites: yes
  categories: [Dinner, Holiday]
  difficulty: Easy
  rating: 5
  notes: |
    This is delicious!!!
  ingredients: |
    1/2 lb meat
    1/2 lb vegetables
    salt
    pepper
    2 tbsp olive oil
    4 cups flour
  directions: |
    Mix things together.
    Eat.
    Tasty.
    Yum yum yum.

- name: My Tasty Recipe 2
  servings: 4-6 servings
  source: Food Network
  source_url: http://www.google.com
  prep_time: 10 min
  cook_time: 30 min
  nutritional_info: 500 calories
  difficulty: Easy
  rating: 5
  photo: | (base-64 encoded image)
  notes: |
    This is delicious!!!
  ingredients: |
    1/2 lb meat
    1/2 lb vegetables
    salt
    pepper
    2 tbsp olive oil
    4 cups flour
  directions: |
    Mix things together.
    Eat.
    Tasty.
    Yum yum yum.
Export Recipes
Paprika currently offers two different export formats:
| Export Formats | |
| HTML | A standard portable data format that allows you to preserve a copy of your recipe collection. Your recipes
will be exported to a directory, with an individual HTML file for each recipe, and an index.html
displaying the list of exported recipes. Each recipe file will contain
hrecipe metadata in the HTML. |
| .paprikarecipes | Paprika's bulk recipe export format. These files can be easily imported into any copy of Paprika. |
How to export your recipes
- Navigate to the Export Recipes screen from the settings panel.
- Choose a category to export. By default
All Recipeswill be selected, but you can choose to export a different category if you would like. - Choose either the
HTMLorPaprika Recipe Format. - Press Export.
- The export file or folder will be written to Paprika's documents directory, which can be retrieved using iTunes file sharing.
Support
Technical Support
For technical support inquiries, please submit a new ticket through our support page.
Frequently Asked Questions
For answers to frequently asked questions, please consult our knowledge base.
Changelog
For a list of changes in each version, please consult What's New on iPhone.
Privacy
Click here for our Privacy Policy.